 Prime Collaboration Assurance deployments (PCA) became very popular since Cisco has started giving it away for free (standard version) with new orders. It is indeed a great tool for those who are willing to make the effort and make it so.
Are you?

Build pro IOS configs. FAST.
The usual scenarios that i had the chance to see went something like this: the customer buys OM/PCA for his environment, it is being deployed and it even monitors all the servers and the GWs and you can even see some utilization of your PRIs and it all looks shining, until you look at the Alarms dashboard that is.
180 active alarms!! uhh, i see someone was busy.. doing anything but looking at the Alarms dashboard. And the customer can’t be blamed. Even if he had a NOC team to his disposal he couldn’t handle the endless stream of unidentified events coming their way.
The truth is, most of us who are facing Prime Collaboration Assurance deployment are not network monitoring professionals. We are mostly UC engineers with a NMS (Network Management System) that fell into our hands.
Deploying NMS is a profession by itself, while most of us had no experience with the procedures, policies and strategies involving these complicated deployments, and this is exactly what we are going to fix!
Since all Prime Collaboration Assurance deployments are different there is no one way to rule them all. Making PCA work for you rather than against you is a process. A process that would take some time. None the less, if you build a good strategy and with the right amount of preparation and coordination of expectations with the customer, you are bound to be successful and enjoy its’ fruits.
Prime Collaboration Assurance deployment steps
Let’s first get a grip on the high level steps and the primary objectives of each one of them:
Plan: Set up expectations and gather requirements
Install: Complete proper sizing and installation.
Discover: Discover and monitor the devices.
Setup: Adapt the config to your environment.
Data cleansing: Get rid of junk alarms. Get your UC config in line.
After dozens of UC NMS deployments I’ve learned that these 5 steps are necessary for a professional Prime Collaboration Assurance deployment.
One thing to pay attention to before we dive in, NMS systems (and sepcifically Prime Collaboration Assurance deployments) in UC solutions are usually being estimated (work effort wise) like a side dish. Although i do agree that PCA is not the main act, but if you want your time to be worth-while and your customer happy, do take into considerations that it does take some time and effort to make this system dance to your flute, so don’t expect it to be over in two days.
Another thing about NMS , is that they are not touch and go style implementations. These implementations tend to stretch for longer periods as weekly reviews and data cleansing are necessary for smooth system operation.
Step 1: Prime Collaboration Assurance Planning

Plan. And i do not mean plan the installation or the VM size or the latest version or patch. The plan i’m talking about has to be made with the customer.
Before we touch a single button, we must understand what does the customer need and expects from the system. What is the end result of this NMS implementation? Now, unless it is a very experienced customer, he probably won’t know to tell you what he wants, so directions are necessary.
You can lead you customer using these questions:
- Is there a NOC team in the company?
- Is there a MoM system? (Manager of Managers- central system that usually receives alarms from all other monitoring subsystems)
- Who should receive the critical alarms? how?
- Who should receive the non-critical alarms? how? What should he do when he receives them?
- Is there anyone who is going to look at the PCA Alarms & Events dashboard?
- What happens if there is a critical alarm during the night?
- Who will be responsible for the system on the customer’s end?
You got the idea.. this type of questions will get the customer’s wheels going and will help you plan the deployment properly with the end in mind.
The point is, in order for the Prime Collaboration Assurance deployment to count, the proper people should receive the right notifications about the relevant events. For example, if the NOC team will receive all of the PCA alarms (could reach hundreds a day before proper cleansing and adjustments)to their dashboard or email it will just make them to discard them altogether.
If you want people to act on these alarms they should be relevant and clear (this is achieved in last step).
Step 2: Prime Collaboration Assurance Install
This step is fairly easy. Check out the install guide and follow the instructions.
Do not forget to do the proper sizing as this step might bite you in the ass if not done carefully. You might need Root Access to install some patches.
The OVAs and deployment types are divided to small, medium, large and very large deployments. The variations are defined by the number of phones in your deployment. Unfortunately this is far from being the whole story.
You have to check the system limits for each deployment model and verify that everything is within limits for your deployment type. To do it go to the System Capacitywiki or Cisco Prime Collaboration deployment guide and check out the whole table for system limits.
What you might find is that even tho’ your deployment has under 20K phones, if you have more than 200 phone access switches or more then 300 SRST sites you’ll have to go for the Large deployment that supports up to 80K phones and requires much more resources.

Step 3: Prime Collaboration Assurance Discovery
This step involves the discovery of the devices in your network.
For this step you need two documents:
1. the list of supported devices
2. how to set them up for discovery
Discovery, in most cases, is done through the CUCM so make sure you pre configure the credential profiles so that all of the devices will be discovered in one go. Pure magic here as all of the devices that are somehow linked to CUCM are getting discovered automatically.
PIC of profiles.
Step 4: Prime Collaboration Assurance Setup
After we have all of our devices monitored by PCA, it’s time for some adjustments. The main ones you should pay attention to are:
- configure backup – Directly with an SFTP server. no client needed.
- configure users – LDAP, SSO, Local.
- configure maximum calls for sip trunks – this is required for the PCA to show the right utilization on these trunks.
- create alarms set– this feature allows us to filter out the alarms we want to send to external entities.
- set up notifications– Combine this with the alarm set filter and configure the destination to the alarms according to the planning section.
- Setup synthetic tests– This is a great feature that is being skipped by many. Consider an environment with one active CUCM and one backup CUCM. All of the devices are registered to one server, so, the question being asked is, how do you know that your backup server will do the job when time comes? I use these tests to check on my backup TFTP servers and backup CUCMs. You can set up registration tests, dial-tone tests and much more. Check the synthetic tests section in the official docs or the Business Guide
Step 5: Prime Collaboration Assurance Data cleansing
Now this one is by far the most important step, without it, everything you’ve done so far will become useless. Without it, you Prime Collaboration Assurance deployment will quickly become the boy who cried wolf, as you and the customer will drown in an ocean of meaningless alarms, waiting for the product to be swept under the rug, to become a theme no one wants to bring up.
In order to avoid these consequences a periodic data cleansing is necessary.
At first these meetings should be held once every two days to clean up the big mess and get the UC systems in line. Later on it can go to once a week or two until the system is stable and lined up.
So how and what should be done in these meetings?
Go over all of the alarms in the Alarms & Events dashboard. Your main focus here is to eliminate irrelevant alarms. For example:
You get tons of phone unregistered threshold exceeded alarms for a certain Device Pool(s). When you look at the alarm you see that it was only one damn phone that got unregistered! Since the default threshold in PCA, for all device pools, for phone unregistered and service quality alarms is 10%, the alarm will go off for every 1 phone that gets unregistered in a 10 devices Device Pool! So get to work and set the proper threshold for each Device Pool. The threshold should be based on the amount of devices in it. PCA offers a great tool with the endpoint by device pool view under OpsView–>Cluster. Use it to decide on the proper percentage threshold for each Device Pool.
Another example is the device unregistered alarm. I was getting tons of these alarms from my 300 branches gateways. These alarms quickly piled up to a mountain of trash in my Prime Collaboration Assurance deployment.
The description of the alarm explained that this device was unregistered from it’s call control. The worst part was that the alarms were never cleared!
Now, since the alarms’ source was the branch router (SIP GW+ SRST) I couldn’t understand what the hell was unregistering from it’s call control as the router is not registered to CUCM in any way.
I decided to dig deeper and went to see the routers logs. I have found that the router was disconnected from the WAN at the time of the alarm, but again, i couldn’t see what was being unregistered. After some more digging, i realized that the PCA was looking at the router as CME (among others). When the branch lost it’s connection to CUCM, the phones got registered to SRST (configured with Telephony Service). When the WAN connection went back up the phones got unregistered from CME-SRST back to their CUCM. This is a normal behavior, but PCA was looking at it differently. All PCA saw was devices getting unregistered from CME and never coming back, thus the alarm never got cleared.
To solve this i ended up disabling the Device Unregistered alarm for endpoints (kept the alarm active for infrastructure devices).
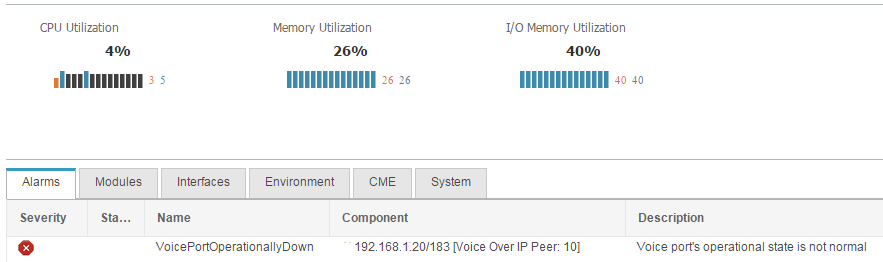
One more example is the VoicePortOperationallyDown.
Usually this alarm raises for PRIs or FXS/FXO on a router, but i was getting this alarm while there was absolutely nothing going on on the router. The alarm did mention that it was raised on peer 10. Only after some excavation work i realized that my Dial-Peer voice 10 Voip was down since it had no valid session-target configured. This required going over the misaligned routers and get the configuration in tact. It was actually a great practice and will definitely prevent future issues.
This is the sort of work that has to be done to get the PCA nice and clean. After several of these you shouldn’t have more than few active alarms on your dashboard.
Epilogue
Deploying a clean, useful and practical Prime Collaboration Assurance is a superior goal which requires patience, focus and dedication but the value you can get from it is definitely worth the effort.
Setting the end result during the planning stage and forming a strategy to execute it is key for achieving the end goal with implementing a NMS systems. Data cleansing will guide you through the customization and personalization of the NMS system to your specific environment. Failure in executing this step will cast a shadow on your whole implementation so take your time with it, it’ll be worth it.
Please, do share your experience, success and difficulties in the comments!
Build pro IOS configs. FAST.